Mail Redirection
Mail Redirection/Forwarding
- Recommendation
- System Redirection
- Setting up Redirection in Office 365
- Redirection Settings in InSIS
- Problems with Mail Forwarding
1. Recommendation [menu]
- Set up the mail forwarding/redirection only on your distribution server. Wrongly used redirection creates problems..
- Make sure the redirection works. If the destination server rejects the mail, InSIS will cancel the redirection. When you redirect in Office 365, emails are lost if they are not stored locally.
- If you also want to save redirected mails also in your school mailbox, use the Office 365 distribution server with significantly more mailbox capacity.
- Full-time students and employees are advised not to forward/redirect mail. Separate your private mail from school/work mail. Install a second mail client on your mobile phone and then you will be notified of new mail from both mailboxes.
2. System Redirection [menu]
Each user receives mail in a mailbox on their chosen distribution server. This is technically solved by the system redirection that cannot be changed by the user. E.g. if you have an Office 365 distribution server, you can see the redirection to Office 365 in your InSIS mailbox:

We set up the system redirection also on the central mail server, which decides where to send messages with the destination address @vse.cz – whether to InSIS or to Office 365.
3. Setting up Redirection in Office 365 [menu]
- Forwarding of All Messages – Simple Rule for Forwarding of All Mail (Including SPAM)
- Redirection or forwarding messages based on Inbox Rules – it is distinguished between redirection and forwarding; only part of the mail can be forwarded, or forwarded to multiple addresses; junk mail is not forwarded.
3.1 Forwarding All Messages, Canceling Forwarding [menu]
In this option, all mail, including spam, is forwarded (redirected). It is easy to set up via the Office 365 web interface. Basic Rules:
- Recipients will see the message as if it came directly from the original sender. In the detailed headers of the email, it is possible to find information about redirection (the user test98@vse.cz with set redirection):
Return-Path: <test98@vse.cz>
Resent-From: <test98@vse.cz>
To: <test98@vse.cz>
- If you choose Save a Copy of Forwarded Messages, the Inbox Rules will apply; spam will be moved in the Junk E-mail folder.
- Once set, make sure the redirection works correctly. If the destination mailbox is unavailable, then one of two things will happen:
- The email is lost; the sender of the email receives a notification “Your message to xyz@example.cz couldn’t be delivered.” In place of xyz@example.com, there is an unknown email address to the sender – the destination email address of their redirection.
- Both the email and the error notification are lost.
>> click for instructions on how to set or cancel redirection in Office 365 <<
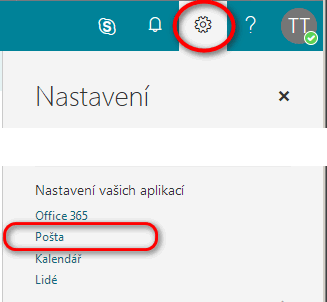
- After logging into Office 365 mail, click
 , then select Mail.
- In the left column, click Forwarding(sometimes you need to expand the option groups) and you will see the options for redirection settings:
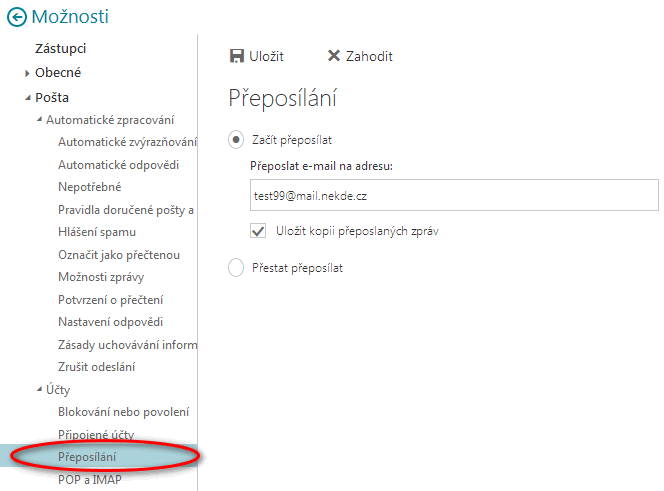
- Fill in the destination address, choose whether to save a copy of forwarded messages and save at the end of the settings.
- Canceling forwarding is in the same place – select Stop Forwarding.
- If you do not find the option of Forwarding, the forwarding setting is not enabled for your account. You may probably have the InSIS distribution server set up.
For more information on forwarding, see Forwarding Emails to Another Email Account .
3.2 Forwarding, redirecting using Inbox Rules [menu]
You can use Inbox Rules to forward or redirect any messages that meet the conditions specified in the rule to another mailing address. For example, only messages from a particular sender can be forwarded, or forwarded to multiple addresses, all messages except for spam can be forwarded.
Spam is not sent to the destination address – spam is placed in the Junk E-mail folder before evaluating the Inbox Rules. If you also want to send spam, you must disable automatic spam filtering.
You can create rules in the web interface or in Outlook for Windows/macOS.
If the destination mailbox is unavailable, the same problems occur as when forwarding/redirecting all messages.
>> click to view the redirect rule setting in the web interface <<
- After logging into Office 365 mail, click , then select Mail.
- In the left panel, find Inbox and Cleanup Rules.

- By clicking the big plus sign, you add a new rule. For the rule, fill in the Name, enter the Condition(s) (in the image, the sender robot@vse.cz is the condition) and then select the action.
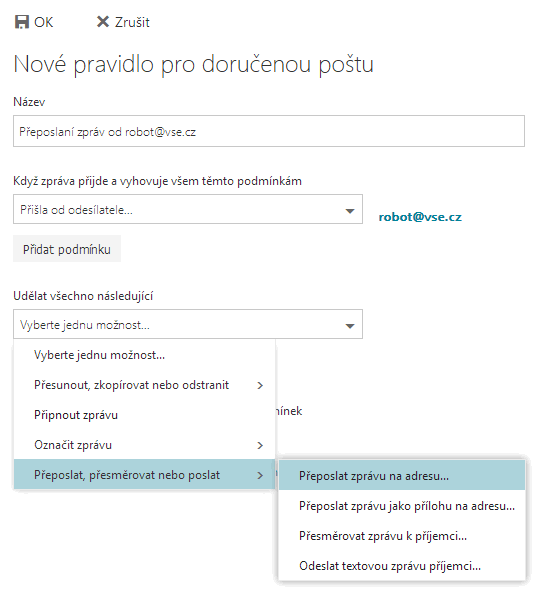
- In the action group Forward, Redirect or Send, you have the following options:
- Forward message to… – FW: is added to the subject of the message, the contents of the forwarded letter are inserted inside the message (only the basic headers of the original letter). A copy of the received message will remain in your Inbox.
- Forward message as an attachment to email address … – Similar to the previous one; only the forwarded message will be enclosed as an attachment including the full headers (eml format). Most mail clients can view content, but there may be display issues when reading on the web.
- Redirect message to recipient… – All mail will be sent unchanged to the specified account. Recipients will see the message as if it came directly from the original sender. In the detailed headers of the email, it can be seen that a redirection occurred.
- Send text message to recipient… – Sending SMS to phone number. I did not try.
If you want to save a copy of the message in Office 365, the Stop processing more rules must not be checked for the forwarding/redirection rules.
You can have more rules depending on the order of the rules.
For more information, see Forwarding Messages Automatically to Another Account Using Rules in Outlook Web App.
4. Redirection Settings in InSIS [menu]
- You can set up one or more redirections in InSIS.
- You can set storing of mail forwarding – beware of 50MB mailbox capacity. If the mailbox is full, new messages will be rejected and not forwarded/redirected.
- You can set that only messages from the study system (so called “system mail”) will be forwarded.
- Spam is not forwarded- if you want to forward it, uncheck the appropriate option in Basic Settings.
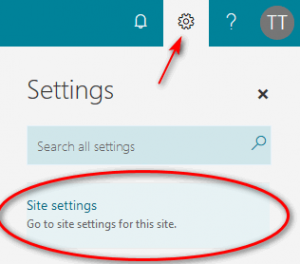
In your mailbox, click Settings on the top menu and then Mail Forwarding: